Knot, knot, knot, knot......oh yeah and then Knot some more. Slowly, but steadily the rag rug is coming into shape. It is about two thirds done. I have it laying on the floor waiting for my husband to dig thru his closet and find more t-shirts he doesn't wear. I had not realized how many shirts I would need in order to make the rug as big as it is. BUT, it looks wonderful!!!!!!
My dog, Kane, has already claimed it as his. Everytime it is laid on the floor, he makes his way over to it, then stares at me with a "will you finish this thing already" look on his face.

Thursday, November 3, 2011

Monday, October 24, 2011
Just call me a workaholic.
Yes it has been two weeks since my last post. If you have been reading this blog for any length of time, it happens during this time of year, every year. Tax deadlines.....to put it as simple as I can....tax deadlines suck. They suck my time, energy and creativity.
At this point, I get two and a half months till the next deadline takes over my energy. To really challenge myself, the rag rug is underway.

Little did I know, it is going to take longer than expected. (what's new right?) I had a skein of black that I thought would be enough for the base. After fastening it off, I realized that base needed to be much larger. Two half skeins of blues later, it finally was a good size. Then came time to start attaching the strips. I knew I did not have enough strips cut up, but I did not realize just how short I am.
The rag rug will take quite some time to complete, but it is going to look so neat.

Monday, October 10, 2011
A Visitor

Finally a visitor to the Bird House!!
I have been waiting weeks for a bird to come to this bird house...WEEKS!! My husband spotted a few of these little birds flying around and alerted me to the small frenzy outside. I started jumping around like a two year old that just received a lolly pop, grabbed my camera and was able to capture this little guy perched getting ready to get some seed from inside.
Friday, October 7, 2011
Under the Covers
I have had this sketch book for a really long time, maybe 5 or 6 years. For a long time it sat with only a couple pages drawn upon. One day I picked it up and decided that it would serve as a "sketch/journal" for clothing design. Inside it would house cut out pictures of clothing that inspired me, sketches of my own imagination and notes. Basically an inspirational book to keep everything together in one place.
I had tore off the cover, that I created a collage on and didn't like, when I decided the new purpose of this sketch book. For months it sat naked, without a cover...till the light bulb went off. A crocheted cover!

This cover is crocheted directly to the spiral binding. The pattern was made up as I went along and hope to write it out to share. For the final touch, used modge podge to stiffen yarn and create a hard cover.

Tuesday, October 4, 2011
Princess of Quite A Lot
The rag rug is taking a lot longer than expected...either that or my motivation for that project hit a low. To break up the monotony, I made this tiara for my soon to be three year old niece.

This was a really really quick project. Took less than an hour and only a small amount of yarn. My niece's birthday is at the end of the month, so I have began making a few things for her. Not sure if she appreciates her Auntie M's handmade gifts as much as I enjoy making them, but till I know different I am going to keep making her things.

Wednesday, September 28, 2011
Eat, Sleep, Work! Repeat.
Haven't been able to get any finished projects done of late. It is that time of year, where my "real" job sucks all of my energy and creativity. I hate tax deadlines!! (and "real" jobs, why didn't I choose to be a go-go dancer?)
After logging into blogger, to read various blogs that I follow and feeling really bad about not posting, last night I pulled out my rotary cutter and, despite my aching back and tired eyes, started work on the rag rug.

A year ago, with some left over dye, I tie dyed three old t-shirts to be used at a later time. I love how each shirt became a different shade of blue. These t-shirts were my inspiration for making the rag rug. The rug is going to be about the size of a kitchen mat, maybe a little bit bigger. The colors will form an ombre effect, with speckles of black throughout.
Still to do, cut black strips, finish crocheting the base and put together.
After logging into blogger, to read various blogs that I follow and feeling really bad about not posting, last night I pulled out my rotary cutter and, despite my aching back and tired eyes, started work on the rag rug.

A year ago, with some left over dye, I tie dyed three old t-shirts to be used at a later time. I love how each shirt became a different shade of blue. These t-shirts were my inspiration for making the rag rug. The rug is going to be about the size of a kitchen mat, maybe a little bit bigger. The colors will form an ombre effect, with speckles of black throughout.
Still to do, cut black strips, finish crocheting the base and put together.
Thursday, September 15, 2011
"From grease to shine in half the time".
I was taught how to make these Tulle Dish Scrubbers, by my wonderful Aunt in Law, three years ago. (and have had the tulle strips cut out and bundled together that long) Unfortunately, last night when I wanted to work on these and finally turn the little bundles of tulle into dish scrubbers, I couldn't remember all the instructions she told me. So I improvised.

Materials:
Size P Crochet Hook
Tulle
Large eye yarn needle
Directions:
Cut tulle into 3" wide strips. You will need two of these strips to make one scrubber, or a total of 6 yards.
Chain 3, join with slst in first ch to make ring.
R1: Ch 1, 8 sc in ring, slst in first sc.
R2: Ch 1, 2sc in each sc from previous row (16 sc), slst in first sc.
R3: Ch 1, sc around. (16 sc), slst in first sc. (About halfway thru this row you will need to join the 2nd strip of tulle. To do this, with about 4 or 5 inches left on the 1st strip, take the 2nd strip and overlap them. Roll the sides up to "lock" them together.)
R4: Ch 1, sc around (16 sc), slst in first sc.
R5: Ch 1, sc2tog around, (8 sc), slst in next stitch.
Fasten off, but do not cut the remaining tail. With yarn needle and remaining tail sew "hole" together. Knot. Tuck the remaining tail into the center of dish scrubber.


Tulle Dish Scrubber
Materials:
Size P Crochet Hook
Tulle
Large eye yarn needle
Directions:
Cut tulle into 3" wide strips. You will need two of these strips to make one scrubber, or a total of 6 yards.
Chain 3, join with slst in first ch to make ring.
R1: Ch 1, 8 sc in ring, slst in first sc.
R2: Ch 1, 2sc in each sc from previous row (16 sc), slst in first sc.
R3: Ch 1, sc around. (16 sc), slst in first sc. (About halfway thru this row you will need to join the 2nd strip of tulle. To do this, with about 4 or 5 inches left on the 1st strip, take the 2nd strip and overlap them. Roll the sides up to "lock" them together.)
R4: Ch 1, sc around (16 sc), slst in first sc.
R5: Ch 1, sc2tog around, (8 sc), slst in next stitch.
Fasten off, but do not cut the remaining tail. With yarn needle and remaining tail sew "hole" together. Knot. Tuck the remaining tail into the center of dish scrubber.

If you have any questions or problems with the pattern, please feel free to email me at hippiemissy@gmail.com.
* Title is taken from the Joy Soap commercial.
Wednesday, September 14, 2011
A Very Berry Harvest

Salmonberries this year was a bust. I believe with all of our nice weather, it was too sunny and hot for them. I could be wrong but that is the only explanation I can come up with. The raspberries on my property however, are abundant! The bushes are taller then ever and there are more berries than I have the patience to gather.
I was able to make two batches of jam last night and intend on gathering some more berries in a couple days. Still no crochet but my pantry is starting to look really good.

(From Left to right, Fireweed Honey, Raspberry Jam, the last 6 jars of Salmonberry Jelly from last year.)
Sunday, September 11, 2011
Summers Over
They say that when the fireweed flowers bloom to the top of their stalk, summer is over. About two weeks or so ago, there was an article in the local paper about fireweed honey, including a simple recipe. At the time there were tons of fireweed blooming all over the place, even some in my neighbors back yard. I procrastinated and didn't go out in search for fireweed till yesterday.
I buy my dog and cat food from a feed store out the road, it is 10 miles out of city limits. I am sure this seems like nothing to folks that live in big cities, but for me this is a little bit of a drive. So yesterday, I load up my dog, Kane, some baggies, my camera and head out to get pet food. The goal was to look for a patch of fireweed that would yield at least two cups of lightly packed flowers.
I drive and drive and drive and it appears that I have missed the mark. All the fireweed patches are void of any flowers, or only have a few left on them. After an hour or so of driving I give up and take Kane home. My husband calls, from work, asking if I will take him some cold medicine. I agree, and too my delight on the way there I see a small patch of fireweed.


Single Recipe: (makes 2 pints)
from www.wildsalmonkitchen.com/blog/
1 1/4 cup of water
5 cups of sugar
1/2 tsp alum
1/4 cup of light Karo syrup
2 cups of lightly packed fireweed blossoms
On the stove, stir water, sugar and alum until it comes to a boil. Watch until the liquid changes from cloudy to white. After the syrup turns from cloudy to clear, remove from heat. Add the washed blossoms to the hot syrup. Stir and let steep for 10 minutes. Strain out the flowers. Bring to a boil again. Pour into sterilized jars. If not sealing jars, store in refrigerator.

This is really, really easy to make! I have yet to taste the honey, but if I approve, some lucky people will be getting some for Christmas.

I buy my dog and cat food from a feed store out the road, it is 10 miles out of city limits. I am sure this seems like nothing to folks that live in big cities, but for me this is a little bit of a drive. So yesterday, I load up my dog, Kane, some baggies, my camera and head out to get pet food. The goal was to look for a patch of fireweed that would yield at least two cups of lightly packed flowers.
I drive and drive and drive and it appears that I have missed the mark. All the fireweed patches are void of any flowers, or only have a few left on them. After an hour or so of driving I give up and take Kane home. My husband calls, from work, asking if I will take him some cold medicine. I agree, and too my delight on the way there I see a small patch of fireweed.

I picked every flower I could get my hands on. After plucking all the flower off, I had 4 lightly packed cups of flowers! Enough for 2 batches.

Single Recipe: (makes 2 pints)
from www.wildsalmonkitchen.com/blog/
1 1/4 cup of water
5 cups of sugar
1/2 tsp alum
1/4 cup of light Karo syrup
2 cups of lightly packed fireweed blossoms
On the stove, stir water, sugar and alum until it comes to a boil. Watch until the liquid changes from cloudy to white. After the syrup turns from cloudy to clear, remove from heat. Add the washed blossoms to the hot syrup. Stir and let steep for 10 minutes. Strain out the flowers. Bring to a boil again. Pour into sterilized jars. If not sealing jars, store in refrigerator.

This is really, really easy to make! I have yet to taste the honey, but if I approve, some lucky people will be getting some for Christmas.

Thursday, September 8, 2011
Blank

That is my creative mind this past week.....blank, empty, blah! I have hemmed pants for a friend though, does that count as crafting. Probably not.
Work as usual is getting in the way with my creative mojo. Really wish I could craft full time for the same salary I am making, but I am sure that is a pipe dream right now.
Also this past week, my oven broke, the hot water heater broke and my husbands truck went into the shop...can you see why I haven't been in the mood to craft?
Anyways enough of my complaining. It is going to give me wrinkles.
Thursday, September 1, 2011
Smile, It will make your day better.
The other day a good friend was over and while we were chit chatting away sitting the couch, she spotted one of my afghans draped over the back of the couch.


Chain 2. Turn.
"Did you make this?"
"Yes"
and then the question...
"Would you make me one?"
"Sure."
then the demands...
"Can you do Smileys in it? And not so holey, and and..."
After she left, my mind was racing with ideas. What would be the best way to make a blanket with smiley faces incorporated into it? Filet crochet? Surface crochet? Tapestry crochet? Embroidery? This project is going to take some testing.
Test #1: Filet Crochet
To start, I created a "Smiley Face Graph" using my computer. I created a 20 x 20 square graph, where each square is one "Mesh". I pulled out some cheap acrylic yarn from my stash and following the chart, went to work.
Here is how it turned out.

The project is 18" wide by 12" tall. (The size is perfect for a place mat.) The Smiley Face turned out well and I think it would be good for a subtle design element.
Would you like to make your very own Smiley Face?
Smiley Face Filet Crochet Chart

Materials:
Any worsted weight yarn.
Size H Crochet hook
Yarn needle for weaving in ends.
Directions:
Chain 65.
DC in 8th Ch from hook.
*Ch 2, skip 2 ch, DC in next chain.* Repeat from * to * across. (You should end up with 20 open squares.)
Chain 2. Turn.
Now you will start following the chart.
- Start with the bottom row.
- Even rows worked from Right to Left.
- Odd rows worked from Left to Right.
- Each square is one "mesh".
- White squares are "closed" mesh.
- Black squares are "open" mesh.
Here are the first two rows written out...
Row one of chart, (or row 20):
*Two DC into ch 2 space, DC into DC from previous row.* Repeat from * to * across. (20 "closed" mesh)
Chain 2. Turn.
Row two of chart, (or row 19):
15 DC (or 5 "closed" mesh), *ch2, skip 2, DC*, repeat from * to * 11 times (or 12 "open" mesh). 15 DC(or 5 "closed" mesh).
Chain 2. Turn.
If you have any questions or problems with the instructions or how to Filet Crochet email me at, hippiemissy@gmail.com
Wednesday, August 31, 2011
The Learning Curve
I am trying to make use of my many crochet books. The one I am diving into right now is "Beyond The Square, Crochet Motifs" by Edie Eckman. This book is filled with crocheted triangles, squares, circles, hexagons and more. It is a granny blanket heaven. I am just starting to get interested in motifs and granny "squares". I think they are beautiful, but I am not a fan of weaving in ends and these motifs require a lot of weaving ends in.

The squares in the picture above is what I have made so far. The square on the far left is made of Popcorn stitches. The square on the far right is the Leaning Tower stitch. What am I going to do with these? Well you will just have to wait and see. (Unless I don't like it, then you may never see.)
Something that I am really enjoying, is learning and practicing stitches that I don't normally do. I have seen them, but I don't normally incorporate them into my work....but I will from now on.

Tuesday, August 30, 2011
The After Party....way after the party.
I don't think I will ever get the food blogs posted on the same day each week, but at least I still am writing them. Everyones' had the "7 Layer Dip" at parties, right? I love to make it. It is easy and fast to put together. Here is a new twist on the traditional "7 Layer Dip".

Ingredients:
Tortillas
Refried Beans
Shredded Mexican Cheese Blend
Sliced Olives
Guacamole
Chives
Serve with Sour Cream
Directions:
On tortilla, spread a layer of Refried beans, sprinkle a layer of cheese. Make line of olives, guacamole and chives (refer to picture). Roll up tortilla, slice, and ENJOY.
Note: You can heat the beans before you put it on the tortillas, it makes the beans a little easier to spread. You can also put them in the oven covered with foil to warm them, but do this before you cut them.
* If you try any of the After Party recipes, I would love to know what you think. If you changed them up, I would love to know what you did. Email me or comment on this post.
Mexican Roll Ups

Tortillas
Refried Beans
Shredded Mexican Cheese Blend
Sliced Olives
Guacamole
Chives
Serve with Sour Cream
Directions:
On tortilla, spread a layer of Refried beans, sprinkle a layer of cheese. Make line of olives, guacamole and chives (refer to picture). Roll up tortilla, slice, and ENJOY.
Note: You can heat the beans before you put it on the tortillas, it makes the beans a little easier to spread. You can also put them in the oven covered with foil to warm them, but do this before you cut them.
* If you try any of the After Party recipes, I would love to know what you think. If you changed them up, I would love to know what you did. Email me or comment on this post.
Wednesday, August 24, 2011
Don't Forget to Accesssorize
Another attempt at a pattern from one of Leslie Stanfields books, this time from "100 Flowers to Knit & Crochet". With full knowledge that my ability to follow gauge is...well poor, (mainly because I like to play with different yarns that may not be what the pattern calls for, and I also like to use up my stash instead of buying new yarns) I still wanted to try some of the flowers in this lovely book. Hoping to not have a bunch of ends to weave in, I picked a really simple three color flower.


This project took absolutely no time at all. Reading and figuring out the pattern took the most time. More of these hair clips coming soon. Maybe I will make all 100 flowers from the book?!?

I used bits and pieces of cotton yarn. Didn't need much. For some people a little big, but for me, I think it turned out just the right size! After using a spray starch to shape and stiffen the petals, I used the fabulous E6000 glue to attach a simple hair clip.

This project took absolutely no time at all. Reading and figuring out the pattern took the most time. More of these hair clips coming soon. Maybe I will make all 100 flowers from the book?!?
Friday, August 19, 2011
Success on the 1st Try
It only took me all week to motivate myself to make something... This week has been a struggle, but with girls night cancelled and my husband out of the house for a few hours, I finally sat down and got my hands busy. Crafting may be like a drug to me...I get such a satisfaction and joy from making things. When I am in a blah mood, if I can get myself to craft, I almost always feel better.
This idea has been bouncing around in my brain for the last week. A rag rug, using old t-shirts with a crochet mesh backing. Instead of just jumping in head first and tackling something as big as a rug, I decided to try a 5" x 5" pot holder first. I am so very happy with the way it turned out, I kind of wish I would of just made the rug.

The pot holder turned out exactly as I wanted it to, which I find amazing! I have written up a pattern and will be sharing very soon if anyone wants it.
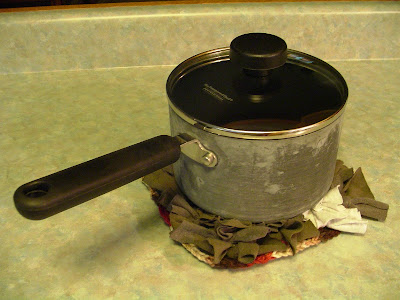
This idea has been bouncing around in my brain for the last week. A rag rug, using old t-shirts with a crochet mesh backing. Instead of just jumping in head first and tackling something as big as a rug, I decided to try a 5" x 5" pot holder first. I am so very happy with the way it turned out, I kind of wish I would of just made the rug.

The pot holder turned out exactly as I wanted it to, which I find amazing! I have written up a pattern and will be sharing very soon if anyone wants it.

Subscribe to:
Posts (Atom)